A Lightweight VPN Built on top of Libp2p for Truly Distributed Networks.

Hyprspace

Go Report Card

A Lightweight VPN Built on top of Libp2p for Truly Distributed Networks.

demo.mp4

Table of Contents

A Bit of Backstory

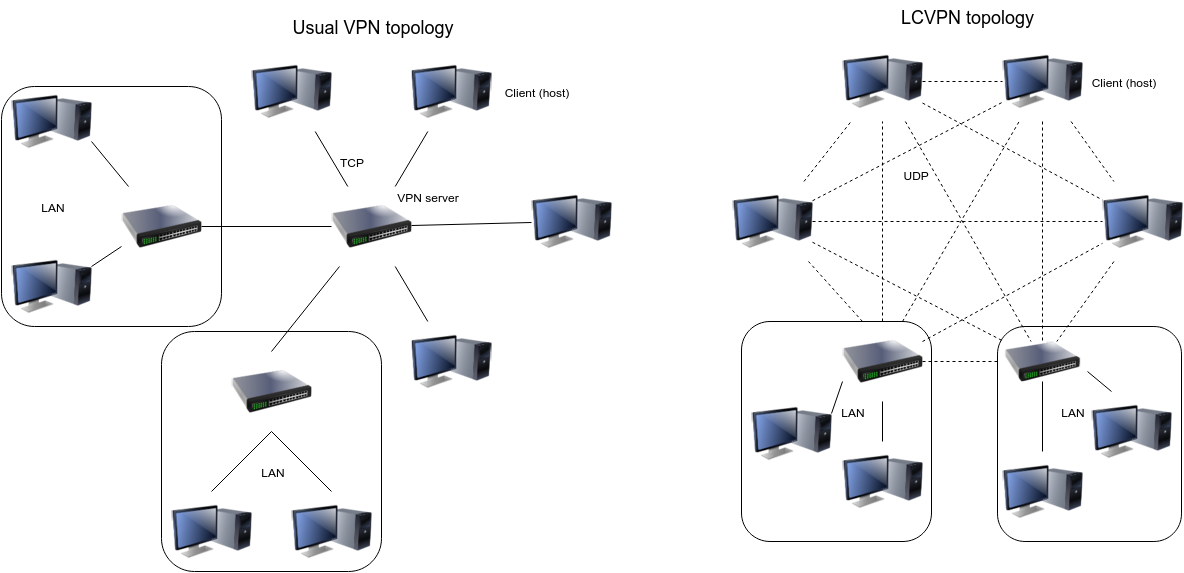
Libp2p is a networking library created by Protocol Labs that allows nodes to discover each other using a Distributed Hash Table. Paired with NAT hole punching this allows Hyprspace to create a direct encrypted tunnel between two nodes even if they're both behind firewalls.

Moreover! Each node doesn't even need to know the other's ip address prior to starting up the connection. This makes Hyprspace perfect for devices that frequently migrate between locations but still require a constant virtual ip address.

So How Does Hyprspace Compare to Something Like Wireguard?

Wireguard is an amazing VPN written by Jason A. Donenfeld. If you haven't already, definitely go check it out! Wireguard actually inspired me to write Hyprspace. That said, although Wireguard is in a class of it's own as a great VPN, it requires at least one of your nodes to have a public IP address. In this mode, as long as one of your nodes is publicly accessible, it can be used as a cental relay to reach the other nodes in the network. However, this means that all of the traffic for your entire system is going through that one system which can slow down your network and make it fragile in the case that node goes down and you loose the whole network. So instead say that you want each node to be able to directly connect to each other as they do in Hyprspace. Unfortunately through Wireguard this would require every node to be publicly addressable which means manual port forwarding and no travelling nodes.

By contrast Hyprspace allows all of your nodes to connect directly to each other creating a strong reliable network even if they're all behind their own firewalls. No manual port forwarding required!

Use Cases:

A Digital Nomad

I use this system when travelling, if I'm staying in a rental or hotel and want to try something out on a Raspberry Pi I can plug the Pi into the location's router or ethernet port and then just ssh into the system using the same-old internal Hyprspace ip address without having to worry about their NAT or local firewall. Furthermore, if I'm connected to the Virtual Hyprspace Network I can ssh into my machines at home without requiring me to set up any sort of port forwarding.

A Privacy Advocate

Honestly, I even use this system when I'm at home and could connect directly to my local infrastructure. Using Hyprspace however, I don't have to trust the security of my local network and Hyprspace will intelligently connect to my machines using their local ip addresses for maximum speed.

If anyone else has some use cases please add them! Pull requests welcome!

Hyprspace is still a very new project. Although we've tested the code locally for security, it hasn't been audited by a third party yet. We probably wouldn't trust it yet in high security environments.

Getting Started

Prerequisites

If you're running Hyprspace on a Mac you'll need to install iproute2mac. If you're using the brew package manager that's as simple as,

brew install iproute2mac

Installation

  1. Go to Hyprspace Releases (over there -->)
  2. Copy the link for your corresponding OS and Architecture.
  3. Run sudo mkdir -p /usr/local/bin/
  4. Run sudo curl -L "PATH-TO-RELEASE" -o /usr/local/bin/hyprspace
  5. Run sudo chmod a+x /usr/local/bin/hyprspace
  6. (Optional) Run sudo ln -s /usr/local/bin/hyprspace /usr/bin/hyprspace

Usage

Commands

Command Alias Description
help ? Get help with a specific subcommand.
init i Initialize an interface's configuration.
up up Create and Bring Up a Hyprspace Interface
down d Bring Down and Delete A Hyprspace Interface
update upd Have Hyprspace update its own binary to the latest release.

Tutorial

Initializing an Interface

The first thing we'll want to do once we've got Hyprspace installed is initialize the configuration for an interface. In this case we'll call the interface on our local machine hs0 (for hypr-space 0) and hs1 on our remote server but yours could be anything you'd like.

(Note: if you're using a Mac you'll have to use the interface name utun[0-9]. Check which interfaces are already in use by running ip a once you've got iproute2mac installed.)

Local Machine
sudo hyprspace init hs0
Remote Machine
sudo hyprspace init hs1

Add Each Machine As A Peer Of The Other

Now that we've got a set of configurations we'll want to tell the machines about each other. By default Hyprspace will put the interface configurations in /etc/hyprspace/interface-name.yaml. So for our example we'll run

Local Machine
sudo nano /etc/hyprspace/hs0.yaml

and

Remote Machine
sudo nano /etc/hyprspace/hs1.yaml

Update Peer Configs

Now in each config we'll add the other machine's ID as a peer. You can find each machine's ID at the top of their configuration file. Update,

peers: {}

to

peers:
  10.1.1.2:
    id: YOUR-OTHER-PEER-ID

Notice here we'll have to pick one of our machines to be 10.1.1.1 and the other to be 10.1.1.2. Make sure to update the interface's IP address for the machine who needs to change to be 10.1.1.2.

Update our Discover Key

Looking in the interface's configuration you'll also notice a field called discover_key (right above the interface's private key). It doesn't matter which discovery key you pick but it much be the same for all of the nodes in your little cluster so that they can find each other.

(*Note you can use different discover_keys with different interfaces on the same host to create different isolated networks.)

discover_key: fiftieth-dandelion-wronged-craftwork

Starting Up the Interfaces!

Now that we've got our configs all sorted we can start up the two interfaces!

Local Machine
sudo hyprspace up hs0

and

Remote Machine
sudo hyprspace up hs1

After a few seconds you should see a the network finish setting up and find your other machine. We can now test the connection by pinging back and forth across the network.

Local Machine
ping 10.1.1.2

Stopping the Interface and Cleaning Up

Now to stop the interface and clean up the system you can run,

Local Machine
sudo hyprspace down hs0

and,

Remote Machine
sudo hyprspace down hs1

License

Copyright 2021 Alec Scott [email protected]

Licensed under the Apache License, Version 2.0 (the "License"); you may not use this file except in compliance with the License. You may obtain a copy of the License at

http://www.apache.org/licenses/LICENSE-2.0

Unless required by applicable law or agreed to in writing, software distributed under the License is distributed on an "AS IS" BASIS, WITHOUT WARRANTIES OR CONDITIONS OF ANY KIND, either express or implied. See the License for the specific language governing permissions and limitations under the License.

Owner
Hyprspace
A Lightweight VPN Built on top of Libp2p for Truly Distributed Networks.
Hyprspace
Comments
  • Could not run on Mac M1

    Could not run on Mac M1

    $sudo hyprspace up hs0
    [+] Creating TUN Device
    2021/08/28 11:05:17 interface already in use
    
    [+] Failed to Create Hyprspace Daemon
    
    $ip a
    lo0: flags=8049<UP,LOOPBACK,RUNNING,MULTICAST> mtu 16384
    	inet 127.0.0.1/8 lo0
    	inet6 ::1/128
    	inet6 fe80::1/64 scopeid 0x1
    anpi1: flags=8863<UP,BROADCAST,SMART,RUNNING,SIMPLEX,MULTICAST> mtu 1500
    	ether 1e:00:3a:34:9a:86
    	inet6 fe80::1c00:3aff:fe34:9a86/64 scopeid 0x4
    anpi0: flags=8863<UP,BROADCAST,SMART,RUNNING,SIMPLEX,MULTICAST> mtu 1500
    	ether 1e:00:3a:34:9a:85
    	inet6 fe80::1c00:3aff:fe34:9a85/64 scopeid 0x5
    en1: flags=8863<UP,BROADCAST,SMART,RUNNING,SIMPLEX,MULTICAST> mtu 1500
    	ether 14:98:77:38:71:b6
    	inet6 fe80::1860:e609:1bcf:1748/64 secured scopeid 0xc
    	inet 192.168.0.130/24 brd 192.168.0.255 en1
    awdl0: flags=8943<UP,BROADCAST,RUNNING,PROMISC,SIMPLEX,MULTICAST> mtu 1500
    	ether f6:59:fc:b3:30:a3
    	inet6 fe80::f459:fcff:feb3:30a3/64 scopeid 0xe
    llw0: flags=8863<UP,BROADCAST,SMART,RUNNING,SIMPLEX,MULTICAST> mtu 1500
    	ether f6:59:fc:b3:30:a3
    	inet6 fe80::f459:fcff:feb3:30a3/64 scopeid 0xf
    utun0: flags=8051<UP,POINTOPOINT,RUNNING,MULTICAST> mtu 1380
    	inet6 fe80::c4fb:3e39:430c:243d/64 scopeid 0x10
    utun1: flags=8051<UP,POINTOPOINT,RUNNING,MULTICAST> mtu 2000
    	inet6 fe80::d81a:79b6:a5f5:68f9/64 scopeid 0x11
    feth3316: flags=8843<UP,BROADCAST,RUNNING,SIMPLEX,MULTICAST> metric 5000 mtu 1500
    	ether 76:84:34:5a:b1:13
    	inet 172.23.99.32/16 brd 172.23.255.255 feth3316
    
  • Persist session info for future connections

    Persist session info for future connections

    I've noticed that hyprspace seems to take the same amount of time to connect to a peer regardless of whether it's the 1st or 100th time, I'm not sure what hyprspace's node saves between sessions (or if it saves anything), but, I believe it should save some important information to speed up reconnects.

    For instance, saving a few of the neighbours of a peer. This would let nodes jump straight to a peer's neighbours instead of searching towards it everytime.

    There's probably a lot that could be persisted which is unique to hyprspace, but I'm struggling to think of anything. I'm interested in knowing what hyprspace does currently in more detail when it comes to authentication.

  • Error I encountered on Windows

    Error I encountered on Windows

    2022/07/03 15:07:43 Failed to find the tap device in registry with specified ComponentId 'tap0901' and InterfaceName 'test', TAP driver may be not installed or you may have specified an interface name that doesn't exist

  • Can't ping between devices

    Can't ping between devices

    Trying to setup a hyprspace connection between my PC and laptop, on the PC's side I'm getting:

    [+] Creating TUN Device
    [+] Creating LibP2P Node
    [+] Setting Up Node Discovery via DHT
    [+] Network Setup Complete...Waiting on Node Discovery
    [+] Connection to 10.1.1.2 Successful. Network Ready.
    [+] Successfully Created Hyprspace Daemon
    
    ip a
    
    12: hs0: <POINTOPOINT,MULTICAST,NOARP,UP,LOWER_UP> mtu 1420 qdisc fq_codel state UNKNOWN group default qlen 500
        link/none
        inet 10.1.1.1/24 scope global hs0
           valid_lft forever preferred_lft forever
        inet6 fe80::2041:4e1d:da41:ba84/64 scope link stable-privacy
           valid_lft forever preferred_lft forever
    

    And on the laptop's side I'm getting:

    [+] Creating TUN Device
    [+] Creating LibP2P Node
    [+] Setting Up Node Discovery via DHT
    [+] Network Setup Complete...Waiting on Node Discovery
    [+] Successfully Created Hyprspace Daemon
    
    ip a
    
    12: hs1: <POINTOPOINT,MULTICAST,NOARP,UP,LOWER_UP> mtu 1420 qdisc fq_codel state UNKNOWN group default qlen 500
        link/none
        inet 10.1.1.1/24 scope global hs0
           valid_lft forever preferred_lft forever
        inet6 fe80::2041:4e1d:da41:ba84/64 scope link stable-privacy
           valid_lft forever preferred_lft forever
    

    I've only gotten the Connection to output to happen once on the PC, all other attempts from then didn't show it, I'm using the latest release on github.

  • QUIC not TCP

    QUIC not TCP

    Discussed in https://github.com/hyprspace/hyprspace/discussions/31

    Originally posted by notassigned September 10, 2021 Since this is a VPN we shouldn't be using TCP, since we may run into a TCP meltdown when running a TCP connection over the VPN connection.

    I suggest switching the listen addrs to QUIC.

    https://openvpn.net/faq/what-is-tcp-meltdown/

  • Support Windows, Linux and presumably macOS

    Support Windows, Linux and presumably macOS

    • Add Windows support
      • Integrate the changes from #63
    • Remove the runtime dependency on the ip command on Linux systems.
      • Use github.com/vishvananda/netlink instead, which calls the kernel directly.
    • Support other OSes, so long as the ip command is available at runtime.
  • Add router option

    Add router option

    Hi @alecbcs @hyprspace, nice project! This PR adds possibility to optionally set one of the remote nodes as router / gateway and so allows to reach LAN networks behind the router or even use it as default gateway to forward Internet traffic via it. In short it adds traditional VPN functional in addition to existing mesh functional. Related issue #33

    Examples hs0.yaml

    interface:
      address: 10.0.2.2/24
      router: 10.0.2.1
    ...
    

    Access LAN network 10.0.0.0/24

    $ ip route add 10.0.0.0/24 dev hs0
    $ ping -c 1 10.0.0.1
    PING 10.0.0.1 (10.0.0.1) 56(84) bytes of data.
    64 bytes from 10.0.0.1: icmp_seq=1 ttl=64 time=7.63 ms
    

    Access Internet (remote node should have configured forwarding and NAT)

    # 17.5.7.8 is the public address of remote node
    # 192.168.0.1 is the local router
    $ ip route add 17.5.7.8 via 192.168.0.1
    $ ip route add default dev hs0 metric 1
    $ curl ifconfig.me
    17.5.7.8
    
  • MIPS/smaller binary

    MIPS/smaller binary

    I've tried compiling hyprspace for MIPS so i can run it on my router, but it turns out that the binary is about 2x as big as all of the storage on my router :D

    I'm wondering how feasible it would be to shrink this binary, maybe i'm just missing a bunch of optimization flags for the compiler? It'd be a shame to not be able to run hyprspace on most routers, since it would be extremely useful.

  • Can not ping when using the phone's wifi or the wifi of university

    Can not ping when using the phone's wifi or the wifi of university

    Hello, I have encountered a strange problem.

    I have a peer which is a cloud server of tencent and the other peer is my mac/ ubuntu computer.

    When my personal computer use the the phone's wifi or the wifi of university, the cloud server and my personal computer cannot ping each other.

    However, when I use the expressvpn in the personal computer, the ping operation can be successful. Can anyone help explain this? Thanks very much.

  • Fix build errors for Windows

    Fix build errors for Windows

    @alecbcs This PR fixes build errors for Windows target after #65 I've also added fix for background mode on Windows when you run hyprspace down command Thanks!

  • Add AUR mention to Readme

    Add AUR mention to Readme

    This pull request adds a mention of the unofficial AUR package to the readme alongside basic instructions. This is my first time dealing with pull requests so sorry in advance for any mistakes.

  • Bump github.com/libp2p/go-libp2p from 0.17.0 to 0.18.0

    Bump github.com/libp2p/go-libp2p from 0.17.0 to 0.18.0

    Bumps github.com/libp2p/go-libp2p from 0.17.0 to 0.18.0.

    Release notes

    Sourced from github.com/libp2p/go-libp2p's releases.

    v0.18.0

    We're happy to announce the v0.18.0 release of go-libp2p.

    🛠 Breaking Changes

    In this release, we're continuing our repo consolidation. We've moved the following repositories into go-libp2p:

    • go-libp2p-autonat
    • go-libp2p-discovery
    • go-libp2p-connmgr
    • go-addr-utils
    • go-libp2p-netutil
    • go-sockaddr

    If you've been using functions from these repositories, please make sure to point those to go-libp2p.

    🔦 Highlights

    The main feature of v0.18.0 is the Resource Manager. The Resource Manager allows the configuration of (among others):

    • the number of incoming / outgoing connections
    • the number of incoming / outgoing streams
    • the number of streams per protocol, and per service
    • memory usage

    For details on how this works, and how to change limits, refer to the README of the Resource Manager.

    In this release, we've finished the transition from ipfs/go-log@v1 to ipfs/go-log@v2. One less dependency!

    Changelog

    ... (truncated)

    Commits

    Dependabot compatibility score

    Dependabot will resolve any conflicts with this PR as long as you don't alter it yourself. You can also trigger a rebase manually by commenting @dependabot rebase.


    Dependabot commands and options

    You can trigger Dependabot actions by commenting on this PR:

    • @dependabot rebase will rebase this PR
    • @dependabot recreate will recreate this PR, overwriting any edits that have been made to it
    • @dependabot merge will merge this PR after your CI passes on it
    • @dependabot squash and merge will squash and merge this PR after your CI passes on it
    • @dependabot cancel merge will cancel a previously requested merge and block automerging
    • @dependabot reopen will reopen this PR if it is closed
    • @dependabot close will close this PR and stop Dependabot recreating it. You can achieve the same result by closing it manually
    • @dependabot ignore this major version will close this PR and stop Dependabot creating any more for this major version (unless you reopen the PR or upgrade to it yourself)
    • @dependabot ignore this minor version will close this PR and stop Dependabot creating any more for this minor version (unless you reopen the PR or upgrade to it yourself)
    • @dependabot ignore this dependency will close this PR and stop Dependabot creating any more for this dependency (unless you reopen the PR or upgrade to it yourself)
    • @dependabot use these labels will set the current labels as the default for future PRs for this repo and language
    • @dependabot use these reviewers will set the current reviewers as the default for future PRs for this repo and language
    • @dependabot use these assignees will set the current assignees as the default for future PRs for this repo and language
    • @dependabot use this milestone will set the current milestone as the default for future PRs for this repo and language

    You can disable automated security fix PRs for this repo from the Security Alerts page.

  • Netscan Detected - Server Locked

    Netscan Detected - Server Locked

    Hello,

    Just wanted to let you guys know that I received an abuse email from my server provider and they locked my server. Looking at the logs they sent, it's obviously coming from the hyprspace instance / interface I had setup.

    > ##########################################################################
    > #               Netscan detected from host   65.21.120.240               #
    > ##########################################################################
    >
    > time                protocol src_ip src_port          dest_ip dest_port
    > ---------------------------------------------------------------------------
    > Mon Oct 17 20:44:14 2022 TCP   65.21.120.240 8001  =>   192.168.1.158 31752
    > Mon Oct 17 20:44:14 2022 UDP   65.21.120.240 8001  =>   192.168.1.158 31752
    > Mon Oct 17 20:44:14 2022 UDP   65.21.120.240 8001  =>   192.168.1.158 31752
    > Mon Oct 17 20:44:18 2022 TCP   65.21.120.240 8001  =>     172.16.0.15 9401
    > Mon Oct 17 20:43:42 2022 UDP   65.21.120.240 8001  =>        10.0.0.2 14584
    > Mon Oct 17 20:43:42 2022 UDP   65.21.120.240 8001  =>        10.0.0.2 14584
    > Mon Oct 17 20:43:42 2022 UDP   65.21.120.240 8001  =>        10.0.0.2 14584
    > Mon Oct 17 20:43:45 2022 UDP   65.21.120.240 8001  =>        10.0.0.2 14584
    > Mon Oct 17 20:43:45 2022 UDP   65.21.120.240 8001  =>        10.0.0.2 14584
    > Mon Oct 17 20:43:08 2022 UDP   65.21.120.240 8001  =>     172.31.1.85 30003
    > Mon Oct 17 20:43:56 2022 TCP   65.21.120.240 8001  =>    172.31.1.143 30003
    > Mon Oct 17 20:43:56 2022 UDP   65.21.120.240 8001  =>    172.31.1.143 30003
    > Mon Oct 17 20:42:05 2022 TCP   65.21.120.240 8001  =>    172.31.4.219 30003
    > Mon Oct 17 20:42:05 2022 UDP   65.21.120.240 8001  =>    172.31.4.219 30003
    > Mon Oct 17 20:42:05 2022 UDP   65.21.120.240 8001  =>    172.31.4.219 30003
    > Mon Oct 17 20:44:19 2022 TCP   65.21.120.240 8001  =>    172.31.4.219 30003
    > Mon Oct 17 20:44:19 2022 UDP   65.21.120.240 8001  =>    172.31.4.219 30003
    > Mon Oct 17 20:44:12 2022 TCP   65.21.120.240 8001  =>   172.31.15.233 30003
    > Mon Oct 17 20:44:12 2022 UDP   65.21.120.240 8001  =>   172.31.15.233 30003
    > Mon Oct 17 20:44:12 2022 UDP   65.21.120.240 8001  =>   172.31.15.233 30003
    > Mon Oct 17 20:44:17 2022 TCP   65.21.120.240 8001  =>        10.0.0.2 34567
    > Mon Oct 17 20:43:37 2022 UDP   65.21.120.240 8001  =>        10.0.0.2 14591
    > Mon Oct 17 20:43:37 2022 UDP   65.21.120.240 8001  =>        10.0.0.2 14591
    > Mon Oct 17 20:43:37 2022 UDP   65.21.120.240 8001  =>        10.0.0.2 14591
    > Mon Oct 17 20:43:38 2022 UDP   65.21.120.240 8001  =>        10.0.0.2 14591
    > Mon Oct 17 20:43:38 2022 UDP   65.21.120.240 8001  =>        10.0.0.2 14591
    > Mon Oct 17 20:43:38 2022 UDP   65.21.120.240 8001  =>        10.0.0.2 14591
    > Mon Oct 17 20:43:38 2022 UDP   65.21.120.240 8001  =>        10.0.0.2 14591
    > Mon Oct 17 20:43:40 2022 UDP   65.21.120.240 8001  =>        10.0.0.2 14591
    > Mon Oct 17 20:43:40 2022 UDP   65.21.120.240 8001  =>        10.0.0.2 14591
    > Mon Oct 17 20:43:42 2022 UDP   65.21.120.240 8001  =>        10.0.0.2 14591
    > Mon Oct 17 20:43:42 2022 UDP   65.21.120.240 8001  =>        10.0.0.2 14596
    > Mon Oct 17 20:43:42 2022 UDP   65.21.120.240 8001  =>        10.0.0.2 14596
    > Mon Oct 17 20:43:42 2022 UDP   65.21.120.240 8001  =>        10.0.0.2 14596
    > Mon Oct 17 20:43:45 2022 UDP   65.21.120.240 8001  =>        10.0.0.2 14596
    > Mon Oct 17 20:43:45 2022 UDP   65.21.120.240 8001  =>        10.0.0.2 14596
    > Mon Oct 17 20:42:54 2022 TCP   65.21.120.240 8001  => 100.124.169.202 32962
    > Mon Oct 17 20:42:55 2022 TCP   65.21.120.240 8001  => 100.124.169.202 32962
    > Mon Oct 17 20:42:57 2022 TCP   65.21.120.240 8001  => 100.124.169.202 32962
    > Mon Oct 17 20:42:39 2022 UDP   65.21.120.240 8001  =>    172.31.2.129 30013
    > Mon Oct 17 20:41:45 2022 UDP   65.21.120.240 8001  =>    172.31.2.180 30013
    > Mon Oct 17 20:41:45 2022 UDP   65.21.120.240 8001  =>    172.31.2.180 30013
    > Mon Oct 17 20:41:45 2022 UDP   65.21.120.240 8001  =>    172.31.2.180 30013
    > Mon Oct 17 20:43:41 2022 TCP   65.21.120.240 8001  =>    172.31.2.180 30013
    > Mon Oct 17 20:43:41 2022 UDP   65.21.120.240 8001  =>    172.31.2.180 30013
    > Mon Oct 17 20:43:41 2022 UDP   65.21.120.240 8001  =>    172.31.2.180 30013
    > Mon Oct 17 20:43:41 2022 TCP   65.21.120.240 8001  =>    172.31.2.180 30013
    > Mon Oct 17 20:43:41 2022 UDP   65.21.120.240 8001  =>    172.31.2.180 30013
    > Mon Oct 17 20:43:41 2022 UDP   65.21.120.240 8001  =>    172.31.2.180 30013
    > Mon Oct 17 20:41:46 2022 TCP   65.21.120.240 8001  =>     172.31.3.50 30013
    > Mon Oct 17 20:41:46 2022 UDP   65.21.120.240 8001  =>     172.31.3.50 30013
    > Mon Oct 17 20:42:32 2022 TCP   65.21.120.240 8001  =>     172.31.3.50 30013
    > Mon Oct 17 20:42:32 2022 UDP   65.21.120.240 8001  =>     172.31.3.50 30013
    > Mon Oct 17 20:42:32 2022 UDP   65.21.120.240 8001  =>     172.31.3.50 30013
    > Mon Oct 17 20:42:32 2022 UDP   65.21.120.240 8001  =>     172.31.3.50 30013
    > Mon Oct 17 20:42:32 2022 UDP   65.21.120.240 8001  =>     172.31.3.50 30013
    > Mon Oct 17 20:43:50 2022 UDP   65.21.120.240 8001  =>     172.31.8.28 30013
    > Mon Oct 17 20:44:18 2022 TCP   65.21.120.240 8001  =>    172.31.8.173 30013
    > Mon Oct 17 20:44:18 2022 UDP   65.21.120.240 8001  =>    172.31.8.173 30013
    > Mon Oct 17 20:44:18 2022 UDP   65.21.120.240 8001  =>    172.31.8.173 30013
    > Mon Oct 17 20:42:31 2022 TCP   65.21.120.240 8001  =>    172.31.9.235 30013
    > Mon Oct 17 20:42:31 2022 UDP   65.21.120.240 8001  =>    172.31.9.235 30013
    > Mon Oct 17 20:42:31 2022 UDP   65.21.120.240 8001  =>    172.31.9.235 30013
    > Mon Oct 17 20:43:18 2022 TCP   65.21.120.240 8001  =>    172.31.10.37 30013
    > Mon Oct 17 20:43:18 2022 UDP   65.21.120.240 8001  =>    172.31.10.37 30013
    > Mon Oct 17 20:43:19 2022 UDP   65.21.120.240 8001  =>    172.31.10.37 30013
    > Mon Oct 17 20:43:28 2022 TCP   65.21.120.240 8001  =>    172.31.12.15 30013
    > Mon Oct 17 20:43:28 2022 UDP   65.21.120.240 8001  =>    172.31.12.15 30013
    > Mon Oct 17 20:44:25 2022 TCP   65.21.120.240 8001  =>   172.31.15.157 30013
    > Mon Oct 17 20:44:25 2022 UDP   65.21.120.240 8001  =>   172.31.15.157 30013
    > Mon Oct 17 20:44:25 2022 UDP   65.21.120.240 8001  =>   172.31.15.157 30013
    > Mon Oct 17 20:42:54 2022 TCP   65.21.120.240 8001  => 100.124.169.202 57091
    > Mon Oct 17 20:42:55 2022 TCP   65.21.120.240 8001  => 100.124.169.202 57091
    > Mon Oct 17 20:44:22 2022 TCP   65.21.120.240 8001  =>        10.0.0.2 51197
    > Mon Oct 17 20:43:45 2022 TCP   65.21.120.240 8001  =>    172.31.0.151 30009
    > Mon Oct 17 20:43:45 2022 UDP   65.21.120.240 8001  =>    172.31.0.151 30009
    > Mon Oct 17 20:43:46 2022 UDP   65.21.120.240 8001  =>    172.31.0.151 30009
    > Mon Oct 17 20:44:20 2022 TCP   65.21.120.240 8001  =>    172.31.2.115 30009
    > Mon Oct 17 20:44:20 2022 UDP   65.21.120.240 8001  =>    172.31.2.115 30009
    > Mon Oct 17 20:44:20 2022 UDP   65.21.120.240 8001  =>    172.31.2.115 30009
    > Mon Oct 17 20:43:50 2022 UDP   65.21.120.240 8001  =>    172.31.8.165 30009
    > Mon Oct 17 20:43:50 2022 UDP   65.21.120.240 8001  =>    172.31.8.165 30009
    > Mon Oct 17 20:43:51 2022 UDP   65.21.120.240 8001  =>    172.31.8.165 30009
    > Mon Oct 17 20:43:51 2022 UDP   65.21.120.240 8001  =>    172.31.8.165 30009
    > Mon Oct 17 20:43:52 2022 UDP   65.21.120.240 8001  =>    172.31.8.165 30009
    > Mon Oct 17 20:43:30 2022 TCP   65.21.120.240 8001  =>    172.31.12.17 30009
    > Mon Oct 17 20:43:30 2022 UDP   65.21.120.240 8001  =>    172.31.12.17 30009
    > Mon Oct 17 20:43:30 2022 UDP   65.21.120.240 8001  =>    172.31.12.17 30009
    > Mon Oct 17 20:43:51 2022 UDP   65.21.120.240 8001  =>   172.31.12.249 30009
    > Mon Oct 17 20:43:51 2022 UDP   65.21.120.240 8001  =>   172.31.12.249 30009
    > Mon Oct 17 20:43:30 2022 TCP   65.21.120.240 8001  =>    172.31.14.43 30009
    > Mon Oct 17 20:43:30 2022 UDP   65.21.120.240 8001  =>    172.31.14.43 30009
    > Mon Oct 17 20:43:30 2022 UDP   65.21.120.240 8001  =>    172.31.14.43 30009
    > Mon Oct 17 20:42:39 2022 TCP   65.21.120.240 8001  =>   172.31.14.179 30009
    > Mon Oct 17 20:44:14 2022 TCP   65.21.120.240 8001  =>  100.69.150.190 40883
    > Mon Oct 17 20:43:37 2022 UDP   65.21.120.240 8001  =>        10.0.0.2 14589
    > Mon Oct 17 20:43:37 2022 UDP   65.21.120.240 8001  =>        10.0.0.2 14589
    > Mon Oct 17 20:43:37 2022 UDP   65.21.120.240 8001  =>        10.0.0.2 14589
    > Mon Oct 17 20:43:38 2022 UDP   65.21.120.240 8001  =>        10.0.0.2 14589
    > Mon Oct 17 20:43:38 2022 UDP   65.21.120.240 8001  =>        10.0.0.2 14589
    > Mon Oct 17 20:43:38 2022 UDP   65.21.120.240 8001  =>        10.0.0.2 14589
    > Mon Oct 17 20:43:38 2022 UDP   65.21.120.240 8001  =>        10.0.0.2 14589
    > Mon Oct 17 20:43:40 2022 UDP   65.21.120.240 8001  =>        10.0.0.2 14589
    > Mon Oct 17 20:43:40 2022 UDP   65.21.120.240 8001  =>        10.0.0.2 14589
    > Mon Oct 17 20:43:42 2022 UDP   65.21.120.240 8001  =>        10.0.0.2 14589
    > Mon Oct 17 20:42:09 2022 TCP   65.21.120.240 8001  =>      10.10.1.94 33513
    > Mon Oct 17 20:42:10 2022 TCP   65.21.120.240 8001  =>      10.10.1.94 33513
    > Mon Oct 17 20:42:12 2022 TCP   65.21.120.240 8001  =>      10.10.1.94 33513
    > Mon Oct 17 20:43:09 2022 TCP   65.21.120.240 8001  =>      10.10.1.94 33513
    > Mon Oct 17 20:43:09 2022 TCP   65.21.120.240 8001  =>      10.10.1.94 33513
    > Mon Oct 17 20:43:10 2022 TCP   65.21.120.240 8001  =>      10.10.1.94 33513
    > Mon Oct 17 20:43:12 2022 TCP   65.21.120.240 8001  =>      10.10.1.94 33513
    > Mon Oct 17 20:44:24 2022 TCP   65.21.120.240 8001  =>      10.10.1.94 33513
    > Mon Oct 17 20:44:25 2022 TCP   65.21.120.240 8001  =>      10.10.1.94 33513
    > Mon Oct 17 20:44:19 2022 UDP   65.21.120.240 8001  =>     172.31.3.14 30002
    > Mon Oct 17 20:44:19 2022 UDP   65.21.120.240 8001  =>     172.31.3.14 30002
    > Mon Oct 17 20:43:18 2022 UDP   65.21.120.240 8001  =>    172.31.12.15 30002
    > Mon Oct 17 20:43:54 2022 UDP   65.21.120.240 8001  =>   172.31.12.127 30002
    > Mon Oct 17 20:43:54 2022 UDP   65.21.120.240 8001  =>   172.31.12.127 30002
    > Mon Oct 17 20:43:54 2022 UDP   65.21.120.240 8001  =>   172.31.12.127 30002
    > Mon Oct 17 20:43:54 2022 UDP   65.21.120.240 8001  =>   172.31.12.127 30002
    > Mon Oct 17 20:43:55 2022 TCP   65.21.120.240 8001  =>   172.31.12.127 30002
    > Mon Oct 17 20:43:55 2022 UDP   65.21.120.240 8001  =>   172.31.12.127 30002
    > Mon Oct 17 20:43:55 2022 UDP   65.21.120.240 8001  =>   172.31.12.127 30002
    > Mon Oct 17 20:43:56 2022 UDP   65.21.120.240 8001  =>   172.31.12.127 30002
    > Mon Oct 17 20:43:53 2022 TCP   65.21.120.240 8001  =>   172.31.13.223 30002
    > Mon Oct 17 20:43:53 2022 UDP   65.21.120.240 8001  =>   172.31.13.223 30002
    > Mon Oct 17 20:43:53 2022 UDP   65.21.120.240 8001  =>   172.31.13.223 30002
    > Mon Oct 17 20:42:44 2022 TCP   65.21.120.240 8001  =>    172.31.5.212 30014
    > Mon Oct 17 20:42:44 2022 UDP   65.21.120.240 8001  =>    172.31.5.212 30014
    > Mon Oct 17 20:42:45 2022 UDP   65.21.120.240 8001  =>    172.31.5.212 30014
    > Mon Oct 17 20:43:18 2022 UDP   65.21.120.240 8001  =>    172.31.7.216 30014
    > Mon Oct 17 20:43:18 2022 UDP   65.21.120.240 8001  =>    172.31.7.216 30014
    > Mon Oct 17 20:44:17 2022 TCP   65.21.120.240 8001  =>    172.31.10.72 30014
    
  • [Feature Request] Support userspace networking just like tailscale

    [Feature Request] Support userspace networking just like tailscale

    I'm using tailscale like this:

    $ /usr/sbin/tailscaled --tun=userspace-networking --state=/var/lib/tailscale/tailscaled.state --socket=/run/tailscale/tailscaled.sock --port 41641
    
    $ tailscale ip
    100.104.51.17
    
    $ ip a
    1: lo: <LOOPBACK,UP,LOWER_UP>
        inet 127.0.0.1/8 scope host lo
    5: eth0@if6: <BROADCAST,MULTICAST,UP,LOWER_UP>
        inet 172.28.0.2/16
    
    $ hyprspace init hs1
    $ hyprspace up hs1
    [+] Creating TUN Device
    2022/09/02 03:06:10 no such file or directory
    

    Anyone can add userspace-networking function into hyprspace?

  • Add multiples routes options

    Add multiples routes options

    Hi @alecbcs @dukzcry This PR is based on #62 but you can set multiple routes. I've move route field to routes section where you define CIDR and node to route, like this:

    interface:
      ...
    peers:
      10.0.0.1:
        id: Qm1....
      10.0.0.3:
        id: Qm2...
      ...
    routes:
      192.168.3.0/24:
        ip: 10.0.0.3
      0.0.0.0/0:
        ip: 10.0.0.1
    
  • 32 Bit Compilation, Comparison with EdgeVPN

    32 Bit Compilation, Comparison with EdgeVPN

    This will have two parts: (i) a short memo about how to compile hyprspace on a 32 bit Linux system, and (ii) a small experiment that compares Hyprspace to EdgeVPN.

    Part I: Compilation

    Running "sudo curl -L https://hyprspace.io/install.sh | bash" does not work on my 32 bit Ubuntu 18.04 machine as there seem to be no binaries provided.

    After git-cloning the source code and running "go build" the compilation halts with

    # github.com/lucas-clemente/quic-go/internal/qtls
    ../go/pkg/mod/github.com/lucas-clemente/[email protected]/internal/qtls/go118.go:6:13: cannot use "quic-go doesn't build on Go 1.18 yet." (untyped string constant) as int value in variable declaration
    

    BTW, this takes place in both, 32 bit and 64 bit systems.

    Inside go.mod I made the following changes:

    go 1.16 => go 1.19

    github.com/libp2p/go-libp2p v0.17.0 => github.com/libp2p/go-libp2p v0.22.0

    Afterwards

    go get -u
    go mod tidy
    go build
    

    halts again, this time with

    ../go/pkg/mod/github.com/ipfs/[email protected]/record.go:49:19: undefined: peer.IDFromString
    yoko@yoko:~/hyprspace$ sudo gedit ../go/pkg/mod/github.com/ipfs/[email protected]/record.go
    

    Edit the corresponding "record.go file" according to the changes in

    https://github.com/ipfs/go-ipns/pull/38/files/3d7f9c2eccc1bcf3ba6dbe543766a49743c546bd

    and run

    go build
    

    This finally produces a neat hyprspace binary of size 33.5MB.

    Part II: Comparison with EdgeVPN

    I have tested hyprspace in three situations connecting PCA to PCB:

    • [x] LAN: ping and ssh work fine.
    • [x] PCA is on a mobile hotspot from "telia.lt wireless ISP", PCB - "skynet.lt wired ISP": Everything's fine too!
    • [ ] PCA on "telia.lt wireless ISP", PCB - "mezon.lt wireless ISP": No luck :(.

    In the last setup PCB is behind some tricky NAT case it seems, but EdgeVPN did punch through it:

    https://github.com/mudler/edgevpn/issues/25

    Changing ports from 8001 to 443 as suggested in some other issues did not improve the situation. I do not know how to debug or log this situation properly and reveal the difference with EdgeVPN. All I see is typically this:

    sudo ./hyprspace up hs0
    [+] Creating TUN Device
    [+] Creating LibP2P Node
    2022/08/22 23:14:50 failed to sufficiently increase receive buffer size (was: 208 kiB, wanted: 2048 kiB, got: 416 kiB). See https://github.com/lucas-clemente/quic-go/wiki/UDP-Receive-Buffer-Size for details.
    [+] Setting Up Node Discovery via DHT
    [+] Network Setup Complete...Waiting on Node Discovery
    [+] Successfully Created Hyprspace Daemon
    

    In the successful cases there is also an additional message squeezed in that the node got connected to some other node in the VPN. I do not know if this display that "node connected to say 10.1.1.2" is critical or not here, whether it is indicating something.

    EdgeVPN takes a lot more time to establish the connection, up to two minutes or so, while hyprspace is always rather quick and getting into that final daemon stage within like 10-20s. In this hard case that EdgeVPN solves, the packets in its established VPN move very slowly as pinging reveals, up to several seconds for a 64 byte value whereas its on the scale of ten milliseconds in the easier cases.

    Does hyprspace have any parameters to adjust to make the program eventually succeed at the expense of a slower resulting VPN? I use this in IoT hobby projects, for now, and for me the most critical is the ability to connect, not whether a VPN is secure or efficient, or the initialization is fast. Could hyprspace be improved in this regard, can I log something valuable for you from that nasty NAT case that I have, and how precisely?

    In any case, thank you for your amazing work, stumbled on hyprspace almost by accident after a long tedious search on github, thinking first that there must be some better "direct p2p way" to solve my permanent Remmina/TeamViewer headaches, then finding go-libp2p and IPFS and not knowing how to approach any of these big systems.

    Lets keep this open for a while, maybe some more insights into hyprspace, its parameters/logging, comparison with EdgeVPN will follow.

A memory-safe SSH server, focused on listening only on VPN networks such as Tailscale

Features Is tested to work with SCP Integrates well with systemd Quickstart Download binary for your architecture. We only support Linux. If you don't

Jun 10, 2022
⛵ EdgeVPN: the immutable, decentralized, statically built VPN. NO central server!

⛵ EdgeVPN Fully Decentralized. Immutable. Portable. Easy to use Statically compiled VPN Usage Generate a config: ./edgevpn -g > config.yaml Run it on

Jan 3, 2023
Walrus 🕑 Real-time event streaming platform built on top of gRPC streams

Walrus ?? Real-time event streaming platform built on top of gRPC streams Table of Contents About the project Built With How it works Getting Started

Sep 24, 2022
Dotcel - Domain name application built on top of celestia

dotcel dotcel is a blockchain built using Cosmos SDK and Tendermint and created

Feb 7, 2022
📦 Command line peer-to-peer data transfer tool based on libp2p.

pcp - Peer Copy Command line peer-to-peer data transfer tool based on libp2p. Table of Contents Motivation Project Status How does it work? Usage Inst

Jan 5, 2023
🌌 A libp2p DHT crawler that gathers information about running nodes in the network.

A libp2p DHT crawler that gathers information about running nodes in the network. The crawler runs every 30 minutes by connecting to the standard DHT bootstrap nodes and then recursively following all entries in the k-buckets until all peers have been visited.

Dec 27, 2022
RPC over libp2p pubsub with error handling

go-libp2p-pubsub-rpc RPC over libp2p pubsub with error handling Table of Contents Background Install Usage Contributing Changelog License Background g

Dec 14, 2022
libp2p implementation in Go

The Go implementation of the libp2p Networking Stack. Table of Contents Background Usage API Examples Development Using the go-libp2p Workspace About

Jan 1, 2023
Transport to allow go-libp2p applications to natively use i2p for communication

I2P Transport for go-libp2p This library can be used to build go-libp2p applications using the i2p network. Look at transport_test.go for example usag

Sep 15, 2022
P2P Forwarder - a tool for farwarding tcp/udp ports. Made using libp2p.

P2P Forwarder A tool for farwarding ports. Made using libp2p. How it works A: opens desired ports ports inside P2P Forwarder A: shares it's id from P2

Nov 14, 2022
A simple toy example for running Graphsync + libp2p.

graphsync-example Here we outline a simple toy example (main.go) where two local peers transfer Interplanetary Linked Data (IPLD) graphs using Graphsy

Dec 8, 2021
Libp2p chat with discovery and pubsub

Dicovery - pubsub chat with libp2p How to test Run boostrap node $ go run main/main.go --port 35005 --nick boot --pk XDLjuaVJ2yKQ2zHMmsee5PGHtDHmkkvFA

Jul 3, 2022
A simple port forward tools build on libp2p with holepunch support.

p2p-tun A simple port forward and tun2socks tools build on libp2p with holepunch support. Usage NAME: p2p-tun - port forward and tun2socks through

Dec 20, 2022
Decentralized VPN in golang

LCVPN - Light decentralized VPN in golang Originally this repo was just an answer on a question "how much time it'll take to write my own simple VPN i

Dec 28, 2022
SonicWall VPN-SSL Exploit* using Golang

goshock SonicWall VPN-SSL Exploit* using Golang ( * and other targets vulnerable to shellshock ).

Jul 6, 2022
A fork of the simple WireGuard VPN server GUI community maintained

Subspace - A simple WireGuard VPN server GUI Subspace - A simple WireGuard VPN server GUI Slack Screenshots Features Contributing Setup 1. Get a serve

Dec 25, 2022
Smart VPN client

Smart VPN client Performs all the standard functions of a VPN client, i.e. manages a connection to a VPN headend. The "smart" functionality includes:

Sep 2, 2022
Decentralized VPN
Decentralized VPN

Decentralized VPN The RadVPN doesn't need any central point as it connects to other nodes directly (full mesh) it has built-in router that helps packe

Jan 8, 2023
Standalone client for proxies of Opera VPN

opera-proxy Standalone Opera VPN client. Younger brother of hola-proxy. Just run it and it'll start a plain HTTP proxy server forwarding traffic throu

Jan 9, 2023