Table of Contents
About The Project
This project is a shared project making use of microservice architecture, API's and a simple frontend to implement a start-up new concept called EduFi. The concept combines education and financial systems to create profit from studying.
There are a total of 23 different Microservices that uses API to communicate with each other, this specific part is handling the transactions and the student's wallet. The package encompasses Listing of all tokens, Listing of a specific token, Viewing all transactions of each token and Sending/Recieving of tokens. To ensure that all alternate scenarios is covered, Atomicity and Validations have been considered and implemented in the algorithms.
To allow the services to be scaled horizontally, docker images have been built and push to the public repository to pull and run it as a container.
Passenger page for getting current status, viewing trips and requesting for trips. [ ]
]
Driver page for getting current status, starting and ending ride. [ ]
]
This assignment's requirements are to create 2 or more microservices which will be ran in the background while a frontend such as website can be used to interact with the functions in the microservices.
This assignment's requirements are to depoly and run each package's Microservices on the server though docker images, and the objective is to ensure that each of the packages microservices has minimal coupling ion with one another. Through API it will allow different microservices to communicate with one another even if the technologies used is different.
There are a total of 2 microservices: (the functions will be shown in each microservice.)
- Transactions
- Creating Transaction
- Updating Transaction
- Ping Reciever Wallet(DATA):Recieve Token
- Deduct Sender Wallet(DATA):Send Token
- Show Transactions(Student,Token)
- Wallet
- Initialize Wallet(During Student Creation)
- Inject tokens(Wallet,Module List)
- Get all Tokens(Wallet)
- Get specific Token(Wallet)
Design Consideration of Microservices
Why 2 Microservice:
- Wallet and transaction usually replies on each other, which was the reason why they were designed to be in seperated Microservices so that it allows lesser Coupling between the two microservices when they communicate.
- Wallet will be the end point througout the sending and recieving of the tokens and transaction will act as a hub for all type of transaction to communicate with than after validation transaction will ping and send data to the correct reciever wallet and deduct the amount from the sender after the ping return a status code 200 which indicates the successful transaction to the receiver, this will improve the overall atomicity of the transactions.
- Wallet Microservice will focus on functions like Initializing Wallet and token and Listing all or a specific Token.
- Transaction Microserice will focus on functions like Creating and updating a transaction, handling the sending and recieving of tokens with validations and showing all transactions for a token.
- This allows each area of focus to be seperated in case if one microservice is required to be shut down for enhancement or errors the other microservices can still operate thus ensuring user experience from the running microservices.
- Example: If Transaction is shut down to update the algorithm or when error occurs, wallet functions like initializing wallet and token and showing tokens can still operate thus ensuring user satisfaction. The opposite can also occur if the wallet is shut down the transactions can still be operational to a certain extend upholding the SLA level.
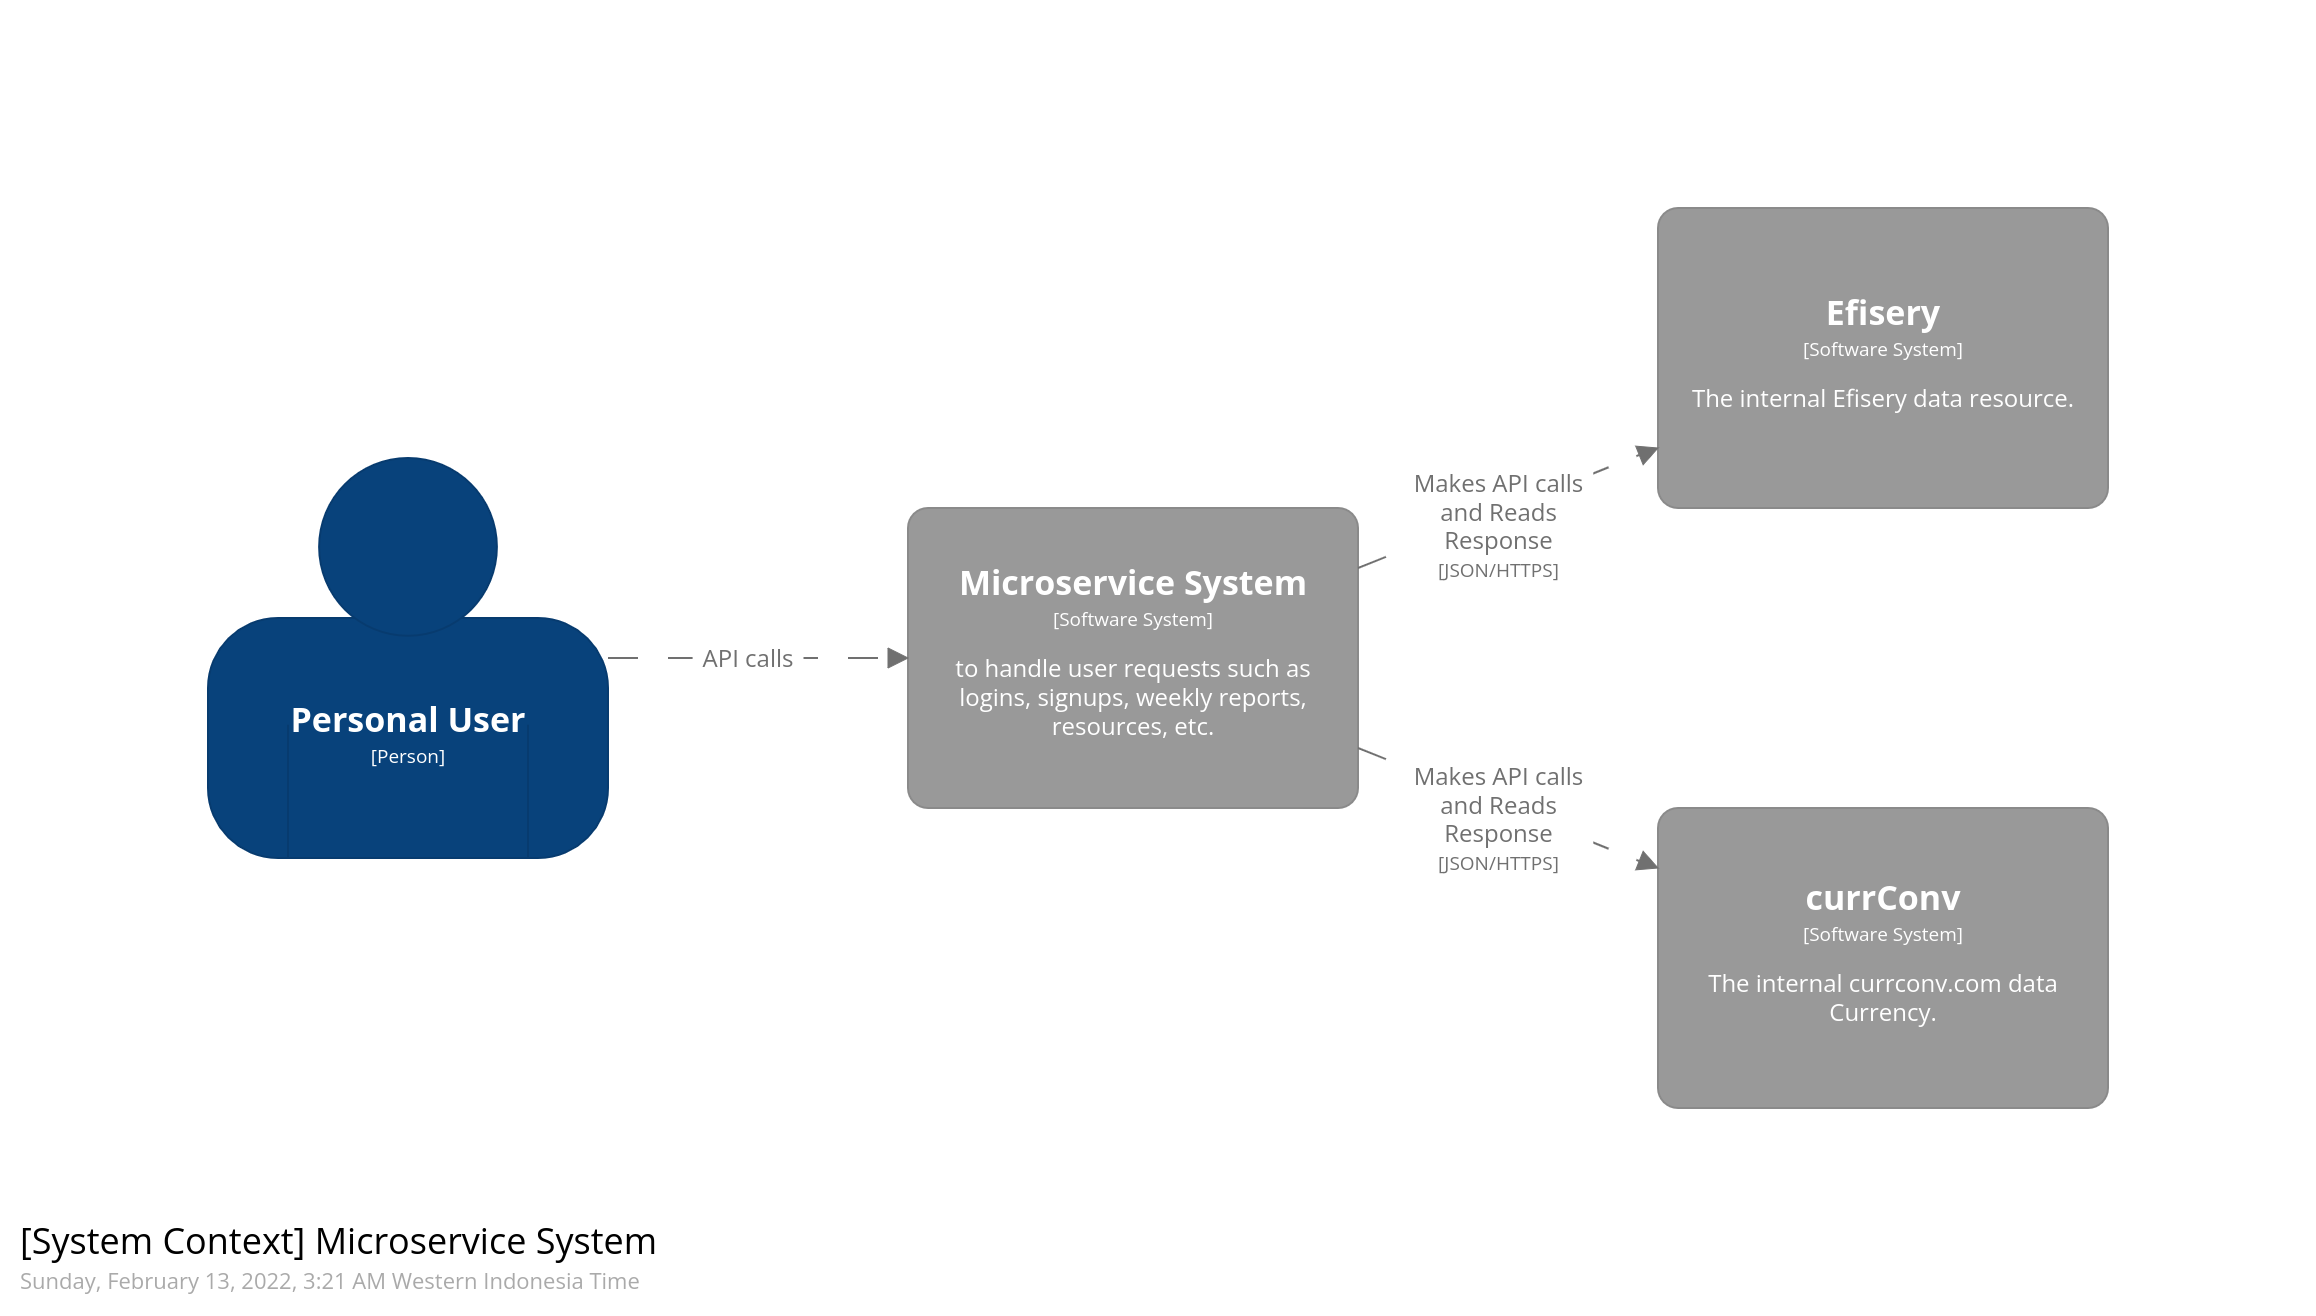
To better understand, below is a diagram of the assignment's structure and how communications are made. [ ] [
] [ ]
]
Built With
The main objective of this assignment is to put the knowledge and skills learnt about Golang to use. Vanilla Javascript and HTML CSS is used for the frontend.
Getting Started
Prerequisites
Make sure that MySQL and Golang is downloaded on your device.
Installation from Github
- Clone the repo
git clone https://github.com/gabgohkb/Assignment2.git
- Install necessary libraries
go get -u github.com/go-sql-driver/mysql
go get -u github.com/gorilla/mux
go get -u github.com/gorilla/handlers
- Execute database start script in
/DB/ExecuteDB_Transaction_Wallet.sql
Installation from Docker
- Clone the repo
git clone https://github.com/gabgohkb/Assignment2.git
- Install necessary libraries
go get -u github.com/go-sql-driver/mysql
go get -u github.com/gorilla/mux
go get -u github.com/gorilla/handlers
- Execute database start script in
/DB/ExecuteDB_Transaction_Wallet.sql
To start using the Wallet platform, follow the below steps:
- Run all microservices in each directory
cd Assignment2\Transaction
go run transac.go
cd Assignment2\Wallet
 go run wallet.go
- Open frontend by opening
WalletHome.htmlinAssignment2\Frontend
Roadmap
- Backend using Golang
- Frontend using HTML JavaScript
- Tidy up both backend and frontend
License
Distributed under the MIT License. See LICENSE.txt for more information.
Contact
Gabriel Goh - School Email
Project Link: https://github.com/gabgohkb/Assignment2.git
Container-Transaction_Microservice Link: https://hub.docker.com/repository/docker/gabgkb/etiassignment2_transactionmicroservice
Container-Wallet_Microservice Link: https://hub.docker.com/repository/docker/gabgkb/etiassignment2_walletmicroservice
Container-MySQLDB_Microservice Link: https://hub.docker.com/repository/docker/gabgkb/etiassignment2_dbtransacwallet